simple website creator


                                                         "The best bitcoin is the one you store yourself"

METHOD 5: Password protected pdf file, encrypted in TrueCrypt, and then buried underground in a usb drive

Security Level = VERY HIGH 


Amount of work to setup = Moderate to Alot
 
Advantages = you never have to fear ever losing your bitcoins so long as you are still alive and remember your password and where you buried the usb. Online wallet accounts can be confiscated or closed down. Computer files can be key logged or deleted. Email servers can be hacked. Physical data drives can be stolen or lost. Bank safety deposit box assets can be frozen or experience security breaches. However, burying your bitcoin private keys in a password protected pdf file makes use of multiple tried and tested and historically secure methods to protect your bitcoins. Think of olden age pirates burying their treasures underground in a hidden location. If no one knows where it is or that it even exists, then no one can target it. The second layer of security comes from the pdf secured file. Even if people accidently dig up your usb, and care to open the package that looks like nothing more than an old plastic bag, they will need to crack the pdf file which is essentially impossible to do without the password.
 
It is recommended that you invest the time to backup ALL your Bitcoin electrum seeds, and bitcoin public and private addresses using this method as soon as you can so that you have the peace of mind that you can always gain access to a copy of all your bitcoin addresses if you unfortunately forget about, or lose, some of your other stored bitcoins. For simplicity, we will call the buried usb with all your electrum seeds, and public and private addresses the MASTER USB. You should also always store at least one copy of a pdf document that contains only the public addresses of this master usb in a separate, easily accessible location so you can track all your addresses and/or deposit more bitcoins into them. These easily accessible but password protected pdf documents should be prepared on the same day the addresses were generated and secured in their own special way (see “Securing public addresses” in the security section). 
 
It is advisable to bury your master usbs in more than one location, one in your backyard and another in a public park somewhere so you can access it easier, in the event you sell the house you are living in, however it is up to you whether the significantly laborious extra effort is worth it. You might even decide to back up the same usb in 3 or more locations in case something happens to the other 2. It’s all up to you.


Disadvantages = If you die unexpectedly or suddenly suffer memory loss or amnesia or become a vegetable due to an accident or something else along similar lines, then your Bitcoins could become permanently lost. To be fair, even buried gold has this problem. All the other storage methods listed before this are prone to the same issue (to varying degrees) which is why METHOD 6 is a good compromise and is listed next.
 
Another disadvantage is that it is a lot of work to transact with (specifically withdraw) any of the bitcoins stored at the addresses on the buried usb. This method offers the highest level of security possible, but in order for this to happen, it should not be accessed much more than once. In bitcoin terminology, you are putting your Bitcoins into deep cold storage (meaning offline and involving significant work to retrieve). The best use for this method is really as a universal backup of all your bitcoin addresses and this is what it should be used for. In fact, we actually recommend you create and use smaller and separated copies of information stored in the Method 5 pdf document using the guidelines shown next, so you have regular access to your bitcoins (see the italicized 7th and 8th points of Method 5 Guidelines).

BEFORE WE START


You might be asking, if we can simply bury somewhere in our backyard a usb containing the ‘TrueCrypt pdf file’ exactly as it is instead of preparing it in this long drawn out process. Surely it should be sufficient and adequate for future retrieval? Once again, like our comments in Method 4, the short answer to this question is: it is entirely up to you but we strongly recommend you follow our instructions to bury it.


When you bury a usb, it is quite a long and tedious process in itself and in our experience once you have done it once, you don’t really want to have to ever do it again even if there are many benefits to doing so. Also, every additional time you bury it is another chance someone may notice. If you follow our process completely the first time around it may take a little longer than it otherwise would, but you can be confident that you have covered most of your bases and prevented most problems that may arise from not burying it using our steps.


GUIDELINES


  • For Method 5, you will need the fully completed TrueCrypt pdf file you plan to bury. In this tutorial we will call this the ‘TrueCrypt pdf file (version A)’. If you don’t have this yet then go to Method 3 and/or Method 4 (method 3: steps 1 – 9, method 4: steps 1 - 5.9) to create one. In Method 3 we created the original ‘password protected pdf file’ with all the seeds, and public and private keys. In Method 4 we stored that in the additional TrueCrypt 7.1a layer and turned it into the more secure ‘TrueCrypt pdf file’. In Method 5 we will be putting everything together and creating the ‘Master usb’ that is to be buried.


  • If you have arrived here straight from Method 3 step 9 then you need to now go to back to Method 4: steps 1 - 5.9 to turn your password protected pdf file into the TrueCrypt pdf file, before returning here. You can ignore all references to the ‘email pdf file’ in the ‘GUIDELINES’ notes or anywhere else. The ‘email pdf file’ in your case is the ‘password protected pdf file’ you created in Method 3.
 
  • It is highly recommended if haven’t already prepared one, to also prepare a password protected ‘Public-Addresses-Only’ version of your TrueCrypt pdf file before you bury the usb. Read the ‘Securing public addresses’ article in the Security section and see Method 6 (Variation 1): steps 4 for details. 
 
  • You will need to either print the instructions out beforehand or view the instructions on a different computer (such as a smart phone, tablet or laptop) for Steps 1.5 – Step 2.1 and Steps 5 – Step 9.14 (of Method 5). Or you could copy and paste all these instructions onto a Microsoft word or other text document and view the instructions from there.
 
  • Method 5 will basically contain the steps on how to optimally bury the TrueCrypt pdf file, and the written instructions to be included in the master usb (to remind yourself how to safely open the file). It also contains the software files that will be included in the master usb that will make accessing and opening the files easier.
 
  • The TrueCrypt pdf file which you plan to bury must not have ever been stored in any other location other than Usb No. 1, 2, 3, or 4 because then another exact copy of it may exist elsewhere which people may find (thereby bypassing your Method 5 storage location) and gaining easier access to all your bitcoin information. 
 
  • What you could do if you want to keep easily accessible copies of the buried master pdf file which contain your seeds, and public and private addresses (apart from simply storing a copy of the file in another usb) is to create a multiple number of smaller TrueCrypt pdf files from the master TrueCrypt pdf file. Each of these secondary TrueCrypt pdf files would be placed in a computer folder with an inconspicuous file name (such as ‘Backup of work files A-E’) and resized to an inconspicuous TrueCrypt file size (such as 100 megabytes). They would then be stored in usb drives (only usb drives) in different secret or secure locations.
 
  • So for example, where your buried master TrueCrypt pdf file (version A) might have the seeds to say all 25 wallets you have ever created (wallets A – Y), you could have 4 smaller unburied TrueCrypt pdf files each containing the seeds to say 5 wallets each (wallets A-E, F-J, K-O, & P-T) with one of the 4 smaller TrueCrypt pdf files containing the public addresses only of wallets U-Y. The goal in doing this is to limit your losses in the event that any one of your Usb’s are discovered and somehow unlocked, and also allow you to have some bitcoin addresses (wallets U-Y) which are long term storage only addresses. To allow easy access to these, the TrueCrypt password for these files (password protected pdf file inside as well as the outer TrueCrypt volume) should both have the same 26-32 character password and not the SHA512 hash of these.
 
  • For Method 5 you will need 4 usb drives in total: 
 
  • You will need 3 prepared usb drives with at least 2 gig data storage each when empty. We will name these Usb No. 5, Usb No. 6 and Usb X. In starting here now at Method 5 you should have just finished Method 4 Step 5. Usb No. 3 therefore now becomes Usb No. 5. Usb No. 4 becomes Usb No. 6. And Usb X remains as Usb X. Don’t use any new or different usb drives. Only change the names of the usb’s.


  • Usb No. 5 contains the newly formatted and installed Zorin OS Core operating system (using method 3: steps 1.4 - 1.5 and steps 2.1 - 2.8). Usb No. 6 is a pre-formatted usb drive containing the ‘TrueCrypt pdf file’ that you plan to bury in the master usb. Usb X is the second newly formatted and installed Zorin OS Core operating system (created during method 3: step 2).
 
  • You will also need 1 additional usb drive with at least 4 gigabyte data storage when empty. We will name this usb the ‘Master usb’. This is the usb drive that will ultimately be buried. Use a usb flash drive that is from a well known brand such as SanDisk.
 
  • You will need an internet connection.
 
  • You should also have plastic (food) wrap, aluminum foil, sticky tape, a small cheap usb hard storage case you can purchase from most office supplies stores, a hard plastic container that is slightly larger than your usb hard storage case, and some strong plastic grocery bags. You will be using these to put the ‘master usb’ in before burying.
 
  • The following steps are specifically for a Windows 7 operating system but you should be able to get it to work on most Windows operating systems as well as some other operating systems.

**********************************************************************************************************************************************************************************

  • As an alternative to the Master Usb and the extra-Usb you can store the final encrypted file/s on a CD or DVD instead by burning them onto it while using the Linux operating system. The in-house burner program is called ‘Brasero’. If you choose to do this (which is HIGHLY RECOMMENDED) then you will also need to have 1 (but ideally 2) CD/DVD writer drive/s connected to the computer. These CD/DVD drives can be either inbuilt into the laptop or connected externally via usb.

**********************************************************************************************************************************************************************************

HOW TO DO IT


Step 1: OPTIONAL STEP: Convert your TrueCrypt pdf file (we call this original file ‘version A’) into a TrueCrypt pdf file (version B) so that it is Method 6 (Variation 2) compatible in the future in incase you ever choose to use Method 6 (Variation 2). This doesn’t take long and is highly recommended.
 
This extra, yet easy to implement step will save you a lot of extra work in the future should you ever want to use this master usb file as the buried master usb file for Method 6 (Variation 2). Basically, the master usb in Method 6 uses a 64 digit numbers-only base password. Our current TrueCrypt pdf file (version A) has a 26-32 character alphanumeric password (or SHA512 hash of this). So completing this step now means you don’t have to go to the trouble later of digging up the master usb to change the password. To be clear though, even with this step implemented, you will still have access to the Method 5 usb files with your alphanumeric password.
 
What we will do in this step is to change your TrueCrypt pdf (version A) password into a 64 digit numbers-only base password by SHA512 hashing it (once or twice) and then using the first 64 numbers in this hash (ignoring all letters) as the (version B) base password. Before we start though, if you haven’t already done so, read the last italicized paragraph of the ‘TrueCrypt Security’ article in the Security section of this website. 
 
 
         Step 1.1: Check that there are no devices attached to any of your laptop’s usb or other entry ports besides your wired mouse and power plug.
 
         Step 1.2: Download ‘QuickHash-Windows-v2.6.9.2’ from https://quickhash-gui.org/download/quickhash-v2-6-9-2-for-windows/ if you don’t already have a copy. Only download this specific version (Windows-v2.6.9.2) but if you can’t find it from this website, do an online search-engine search to download it from another site. If you download it from another site, check that the checksum of the file is correct (see our ‘Checksums’ page in our Security section for details). If you don’t want to use this particular program, then you can use a different SHA512 hashing software package but test it out first by comparing the results with those from other sources. Also, the result must contain capital and not lowercase letters. Copy and paste it onto Usb X. 
 
        Step 1.3: Download the ‘TrueCrypt 7.1a’ installation package for Linux operating systems from https://www.grc.com/misc/truecrypt/truecrypt.htm if you don’t already have a copy. Only download this specific version (version 7.1a) and if you can’t find it from this website, do an online search-engine search to download it from another site. If you download it from another site, check that the checksum of the file is correct (see our ‘Checksums’ page in our Security section for details). The name of the file is truecrypt-7.1a-linux-x64.tar.gz (for 64 bit machines) or truecrypt-7.1a-linux-x86.tar.gz (for 32 bit machines). Copy and paste the downloaded file onto Usb X.
 
        Step 1.4: Download ‘Foxit Advanced PDF Editor 3.1.0.0’ from https://foxit-advanced-pdf-editor.en.softonic.com/ if you don’t already have a copy. Only use this specific version (version 3.1.0.0) and if you can’t find it from this website, do an online search-engine search and download it from another site. If you download it from another site, check that the checksum of the file is correct (see our ‘Checksums’ page in our Security section for details). Copy and paste the downloaded file onto Usb X.
 
        Step 1.5: Boot up your computer in a newly created Zorin OS Core (Linux based) operating system using Usb No. 5. See Method 3: steps 3.1 - 3.4 if you don’t remember how to do this.
 
        Step 1.6: Insert Usb No. 6 or Usb X (whichever drive contains the program) and run ‘QuickHash-Windows-v2.6.9.2’ from the usb drive. Enter into ‘QuickHash-Windows-v2.6.9.2’ your 26 – 32 character password for the original ‘password protected pdf file’ currently in TrueCrypt pdf file (version A). What this program will do is to convert any character string you enter into it, into another character string consisting of exactly 128 letters and numbers, and this new character string is called a SHA512 hash of the first character string.
 
        Step 1.7: SHA512 hash this password once. Zorin OS Core: in main menu of ‘QuickHash-Windows-v2.6.9.2’, in the ‘Text’ tab under ‘Hash Algorithm’, select SHA512 > enter 26- 32 character password into the ‘Text Hashing’ box > SHA512 hash result is displayed on the bottom of program 
 
        Step 1.8: Take the result and SHA512 hash it again.
 
        Step 1.9: Now after copying and pasting the results onto a new Text File on your Desktop, carefully remove all the letters from this result. Do this twice to make sure you've done it accurately.
 
        Step 1.10: Now only keeping the first 64 numbers that are in this result, remove all the other numbers. Do this twice to make sure you've done it accurately. This is your 64 numbers-only base password.
 
        Step 1.11: Now SHA512 hash these 64 numbers. The result of this we will call the SHA512 (1) hash.
 
This SHA512 (1) hash of these 64 numbers is now your password to the new ‘password protected pdf file’ that will be in ‘TrueCrypt pdf file (version B)’. See Method 6 Variation 2 ‘Additional Information’ notes at the end for an explanation -if you are interested- of why we don’t simply use these 64 numbers as the password.
 
        Step 1.12: Take the SHA512 (1) hash of the 64 numbers which is the password to the ‘password protected pdf file’ in ‘TrueCrypt pdf file (version B)’ and SHA512 hash it again. This result which we will call the SHA512 (2) hash will be used as the password to ‘TrueCrypt pdf file (version B)’. 
 
Look at the following graph to more clearly understand this process


        Step 1.13: Now that you know all the new password codes, copy and paste ‘TrueCrypt pdf file (version A)’ from Usb No. 6 onto your Zorin OS Core Linux desktop. Keep the copy that is still on Usb No. 6.
 
        Step 1.14: Open the ‘TrueCrypt pdf file (version A)’ on your desktop using the TrueCrypt program and change the password to the new password. Once the password is changed, that TrueCrypt file will become ‘TrueCrypt pdf file (version B)’. 
 
Zorin OS Core 12: Install TrueCrypt program downloaded in Method 5: step 1.3 (see Method 4: steps 3.1-3.8 for details) > Open TrueCrypt program (see Method 4: step 4.1 for details) > Then… click ‘Select File...’ > click on ‘Desktop’ on left side of TrueCrypt screen > click on ‘TrueCrypt PDF file (version A)’ > click ‘Open’ > click on any ‘Slot’ (1-64) on TrueCrypt main menu > click ‘Mount’ > enter ‘TrueCrypt pdf file (version A)’ password > click ‘OK’ > click ‘Volume Tools...’ on TrueCrypt main menu > click ‘Change Volume Password…’ > enter current ‘TrueCrypt pdf file (version A)’ password > enter new ‘TrueCrypt pdf file (version B) password in correct fields > click ‘OK’ > move mouse randomly in ‘TrueCrypt – Random Pool Enrichment’ screen for a while (‘TrueCrypt User Guide’ pdf recommends 30 seconds) > click ‘Continue’ > click ‘OK’ > wait a short while > click ‘OK’ once password change screen appears.
 
        Step 1.15: Open the ‘password protected pdf file’ in ‘TrueCrypt pdf file (version B)’ using ‘Foxit Advance PDF Editor 3.1.0.0’ and change the password to the new 64 digit numbers-only password. 
 
Part 1: Zorin OS Core 12: Open TrueCrypt pdf file mounted volume on the Zorin OS Core desktop by double clicking on it (it should already be mounted in TrueCrypt) > cut and paste ‘password protected pdf file’ in the TrueCrypt folder onto the Zorin OS Core desktop > Install and open Foxit Advanced PDF Editor 3.1.0.0 (see Method 3: steps 7.1 – 7.7 for details). 
 
Part 2: Zorin OS Core 12: In ‘Foxit Advanced PDF Editor 3.1.0.0’ main screen click ‘File’ > then click ‘Open...’ > then beside ‘Look in:’ search for the ‘Desktop’ > then search for the ‘password protected pdf file’ and click on it > then click ‘Open’ > enter old password > press ‘OK’ >. Now in ‘Foxit Advanced PDF Editor 3.1.0.0’ main menu click ‘Document’ > click ‘Security… > select ‘Security Level: Acrobat 7 Onwards (128-bit AES)’ > enter new ‘Open password’ > click ‘OK’ > re-enter new password > click ‘OK’ > click ‘File’ > click ‘Save’ > hit the [spacebar] on the keyboard where is asks for your name > click ‘OK’ > click ‘Add Watermark’ > then close ‘Foxit Advanced PDF Editor 3.1.0.0’. 
 
Part 3: Zorin OS Core 12: Now cut and paste the newly changed ‘password protected pdf file’ on the Zorin OS Core desktop into the ‘TrueCrypt pdf file (version B)’ folder/volume > then close the ‘TrueCrypt pdf file (version B)’ folder/volume > ‘Dismount All’ in TrueCrypt main screen > then close TrueCrypt main screen. 
 
        Step 1.16: Double check that your new pdf and TrueCrypt files are working correctly and that the passwords have been changed accurately by running the programs again and entering all the passwords in from the start. Once you are satisfied everything is correct, dismount from the TrueCrypt program, and close all unnecessary windows.
 
        Step 1.17: Rename the new ‘TrueCrypt pdf file’ on the Zorin OS Core desktop to ‘TrueCrypt pdf file (version B)’ then copy and paste ‘TrueCrypt pdf file (version B)’ onto Usb No. 6. Do not overwrite or delete the ‘TrueCrypt pdf file (version A)’ on Usb No. 6 since we will be storing both version A and version B in the buried ‘Master usb’.
 
You have now converted your TrueCrypt pdf file (version A) to a Method 6 compatible TrueCrypt pdf file (version B) and are currently storing it in Usb No. 6. 
 
Now is your best chance to create smaller TrueCrypt pdf files (version A) if you haven’t already done so and if you want to retain secured and easier access to information in your buried Master usb drive in the future. See the italicized 7th and 8th points of Method 5 Guidelines for details. If you create these, make sure you delete any unsecured work-in-progress files you may have saved on Usb No. 6 before shutting down the Zorin OS Core operating system. 

Now is also your best chance to create a ‘Public-Addresses-Only’ non password protected pdf version of your ‘password protected pdf file’ to include in your buried usb, if you don’t already have one. See Method 6 (Variation 1): step 4 for details of how to do this. 
 
 
Step 2: Prepare to install needed files onto your soon to be buried ‘Master Usb’
 
        Step 2.1: Boot up your computer in your regular operating system (in our case Windows 7).
 
        Step 2.2: Connect your ‘Master usb’ drive and do a complete format of it (a complete format should be done and not a quick format). Windows 7: Right click usb drive > click ‘Format…’ > Uncheck ‘Quick Format’ > click ‘Start’ > click ‘OK’.
 
         Step 2.3: Do a complete ‘Eraser’ format of your ‘Master usb’. This process can take a while so be patient. (See method 3: step 1.3 if you don’t remember what this is). Windows 7: Right click usb drive > select ‘Eraser’ > click ‘Erase Unused Space’.

        Step 2.4: Download ‘Universal-USB-Installer’ from https://www.pendrivelinux.com/universal-usb-installer-easy-as-1-2-3/ if you don’t already have a copy. The most recent version should work but if you can still find it, use version ‘Universal-USB-Installer-1.9.6.9’. Save it onto your main computer. 
 
        Step 2.5: Download an ISO of ‘Linux Mint 18.1 cinnamon version’ from https://www.linuxmint.com/download_all.php . Only download the Linux Mint 18.1 cinnamon version (32 bit version) and if you can’t find it from this site, do an online search-engine search and download it from another site. If you download it from another site, check that the checksum of the file is correct (see our ‘Checksums’ page in our Security section for details). You only need the 32 bit version because most newer 64 bit computers are backwards compatible and can run the 32 bit version. Save it onto your main computer.
 
        Step 2.6: Download ‘QuickHash-Windows-v2.6.9.2’ from https://quickhash-gui.org/download/quickhash-v2-6-9-2-for-windows/ if you don’t already have a copy. Only download this specific version (Windows-v2.6.9.2) but if you can’t find it from this website, do an online search-engine search to download it from another site. If you download it from another site, check that the checksum of the file is correct (see our ‘Checksums’ page in our Security section for details). If you don’t want to use this particular program, then you can use a different SHA512 hashing software package but test it out first by comparing the results with those from other sources. Also, the result must contain capital and not lowercase letters. Copy and paste it onto Usb X. 
 
        Step 2.7: Download the ‘TrueCrypt 7.1a’ installation package for Linux operating systems from https://www.grc.com/misc/truecrypt/truecrypt.htm if you haven’t already got a copy. Only download this specific version (version 7.1a) and if you can’t find it from this website, do an online search-engine search to download it from another site. If you download from another site, check that the checksum of the file is correct (see our ‘Checksums’ page in our Security section for details). The name of the file is truecrypt-7.1a-linux-x86.tar.gz (for 32 bit machines). You only need the 32 bit version because most newer 64 bit computers are backwards compatible and can run the 32 bit version. Copy and paste the downloaded file onto Usb X. 
 
        Step 2.8: Download Electrum software (portable version for Windows operating system) from https://electrum.org/#home. Only download version ‘electrum-2.7.12-portable.exe’. Their directory for old versions of the software is https://download.electrum.org/ . Only download from the official website shown here but if the file is definitely not available, then you can download from another site, but you do this you MUST do a checksum check. This version of electrum portable is the only version that this guide supports for offline use and is perfectly suited to our needs since any bitcoin seeds and keys generated from it are forward compatible with newer versions of electrum. Copy and paste this program onto Usb X. 
 
 
Step 3: Create a Linux Mint 18.1 Cinnamon portable boot usb drive on your ‘Master Usb’ with a ‘Persistent file size'

*****************************************************************************************************************************************************************************************
CRITICAL UPDATE: Linux Mint requires a temporary connection to the internet in order to install some software to make the Electrum program run. For this reason it CANNOT be regarded as secure for the purpose of creating offline electrum wallets for real world use. The Zorin OS usb operating system should always be used instead for this purpose. The Linux Mint operating system instructions are still included here however to enable computer enthusiasts to experiment with different Linux based operating systems, in order to see how they work.

You will need to make the appropriate alterations yourself when following these steps to create the Zorin OS 12 Core portable boot usb drive on your ‘Master Usb’ with a ‘Persistent file size’. This is really only needed for Method 5: Step 3, Method 5: Step 5, and Method 5: Step 6 (skip this step), so the process is fairly similar.  

*****************************************************************************************************************************************************************************************
 
         Step 3.1: Disconnect from the internet. Then connect your ‘master usb’ into your laptop usb port.
 
        Step 3.2: Open the Universal-USB-Installer software from Step 2.4. If the Windows User Control screen appears asking for permission click ‘Yes’.
 
        Step 3.3: On the first screen, select ‘I Agree’. 
 
        Step 3.4: In the ‘Step 1: Select a Linux…’ drop down menu, select ‘Linux Mint’.
 
        Step 3.5: In the ‘Step 2: Select your ‘linuxmint*.iso’ drop down menu, click ‘Browse’, search for the file you downloaded in Step 2.5, and then press ‘Open’. 
 
        Step 3.6: In the ‘Step 3: Select the drive letter…’ drop down menu, select the ‘Master usb’ drive. 
 
        Step 3.7: In the ‘Step 4: Set a Persistent file size for storing changes (Optional).’, drag the slider to around 1500 MB. 
 
What adding a Persistent file size basically does is that it creates a Linux Mint portable boot usb drive that will save all changes made to the usb everytime you shut down your computer after booting from it. This feature is not desirable when we are creating the password protected pdf files since we don’t want to leave unnecessary traces of the files, however, for use as a Method 6 Master usb, this feature is very handy.
 
        Step 3.8: Click ‘Create’. And then click ‘Yes’ on the next screen to confirm you will be formatting the usb and installing the Linux Mint operating system onto the usb drive. 
 
        Step 3.9: Wait until the process is complete and then close all the windows.
 
 
Step 4: Prepare the written instructions (non-password protected pdf document) to include in the Master usb
 
        Step 4.1: Copy and paste the following text onto a New Office Document (Microsoft word document, WPS writer document or any other document format that retains the correct formatting when copied onto). These words are all the instructions you will include in your master usb. If you do not have a particular file (ie. TrueCrypt pdf file (version B), or QuickHash-Windows-v2.6.9.2, or ‘Public Addresses Only’ pdf file) then do not copy and paste the notes related to them.
 
 
                                                                                                        TEXT TO BE COPIED AND PASTED            
                                                                                                                                                                                                                                    
                                                                                                                     >>> Start of Doc <<<

***Go to www.bitgoldwallet.com for information on what bitcoin is and how to safely buy, use and store it, and how to choose a secure and memorable password (like the one that may have been used to secure these files). Its Method 5 section also has a copy of these instructions below***

NOTE TO READER

This USB drive gives you real access to all the Bitcoins I own! Bitcoins are like real money and must be treated as such. Do not allow anyone else access to this usb drive or any files on it at anytime.

Before taking any action you MUST do the following in this exact order to guarantee that you know enough about Bitcoin to start accessing it safely. Making a mistake could cause you to lose ALL these bitcoins to an accident or to theft.


                1. Copy and paste this ‘IMPORTANT INSTRUCTIONS…’ document as well as all ‘TrueCrypt pdf files’ on this usb onto your main computer hard drive. Also copy and paste all these to another storage medium as a second backup such as a usb drive or an external hard drive. Try not to accidently delete these files but if you do, do not stress cos all is not lost since another copy of these exist elsewhere on this usb. If you accidently delete these then move onto instruction 2, but remember to copy and paste these files to your main computer when you next get the chance. 


                2. Go to www.bitgoldwallet.com and read all the articles about bitcoin on the ‘Intro’ section. Get an idea of what it is. Then do an online search to see what the current price per bitcoin is.


                3. Look at Method 2 on www.bitgoldwallet.com . Read the entire article and then complete Method 2: steps 1-4 to install Electrum software on your main computer. Create the first wallet file so you know how they work.


                4. If there is a ‘Public Addresses Only’ pdf file on this usb, create a ‘watching only’ wallet in the Electrum software you just installed on your main computer. You will soon find out exactly how many bitcoins we have and can estimate what they are worth. To create the watching wallet: Open ‘Electrum program> press ‘File’ > press ‘New/Restore’ > click ‘OK’ > select ‘Watch Bitcoin addresses’> copy and paste all public addresses from pdf file into Electrum program > click ‘Next’ > click ‘OK’.


                5. Now you should know what all the Bitcoins are worth. If you still don’t know, then go back to steps 2-4 and do it again. This is important. Also know that there is a chance that I have more bitcoins which are not in these addresses but which can be viewed by opening the encrypted files on this usb and then creating ‘watching only’ wallets using the ‘master public keys’ in the password protected pdf file, instead of from the ‘Public-Addresses-Only’ pdf file.


                6. Now go to www.bitgoldwallet.com and using 3 completely different usb drives (DO NOT use this one), do Method 3: steps 1.1-1.7, then Method 4: step 1.1, then Method 5: step 1.2, then Method 3: steps 2.1–4.3, then Method 4: steps 3.1- 3.8. These steps will show you how to create a Linux usb operating system which you need to create and use everytime you want to securely access the ‘TrueCrypt pdf files’. 


                7. You are now almost ready to open the password protected encrypted TrueCrypt folders and pdf files which contain all my electrum seed words, seed extension words, bitcoin public and bitcoin private keys. Before we do this though, complete Method 3: steps 9.5-9.7 & 9.10 -9.12. These steps show you what you need to do everytime, after you have accessed the ‘TrueCrypt pdf files’. Basically, you need to completely and thoroughly delete both usb drives. You will need to format and delete ‘this’ usb drive as well after you have used it for the first time.


                8. You are now ready to access the TrueCrypt pdf file on this usb using the Linux usb operating system that is installed on this usb. You must stay disconnected from the internet for the entire time you are using this Linux based usb operating system. Once you have opened the TrueCrypt pdf file, you can create a wallet file using electrum portable by using the ‘seed’ words and ‘seed extension’ words. In Linux Mint: Double click ‘electrum portable’ program > click ‘File’ > click ‘New/Restore’ > enter new name > click ‘OK’ > select ‘Standard wallet’ > click ‘Next’ > select ‘I already have a seed’ > click ‘Next’ > click ‘Options’ > select ‘Extend this seed with custom words’ > click ‘OK’ > enter ‘seed’ words > click ‘Next’ > enter ‘seed extension’ words > click ‘Next’ > enter a strong password into both boxes > click ‘Next’. 


                ALWAYS add a strong password when it asks you to enter one. See the notes below after “Electrum portable’ software:” in this ‘IMPORTANT INSTRUCTIONS…’ document for advice on what to do afterwards with your newly created electrum wallet files in order to use them.


This usb drive has the following files installed and ready to use:

Linux Mint usb operating system: Use this usb operating system to view all the password protected files on this usb for the first time. This Linux Mint usb drive operating system is a one time use only and once the password is entered, it should be considered ‘used’ and must not be reused after shutting down the computer. Only the TrueCrypt pdf file and other files on the usb should be reused and re-accessed using a newly created Linux usb operating system. 


To view the files on this usb, you need to boot up the usb in your computer by:


1. Connecting this usb to one of your usb ports (ideally the fastest port -UBS3 if available), and then turning on the computer.


2. Waiting for the system to boot up automatically (works for some computers). If this doesn’t happen then restart your computer again and immediately press ‘F12’ repeatedly as it is booting up. This should allow you to either change the boot device order to have the removable usb drive load first, or to select a preferred boot device. In either case, select this usb drive as the boot device. If pressing ‘F12’ doesn’t work then restart your computer again and this time repeatedly press ‘Escape’. This step should allow you to boot up this usb on your computer.


After the usb is booted, all of the following files will be on the Linux Mint usb operating system’s desktop. Simply click on these to use.

This usb drive contains the following files:

TrueCrypt pdf file (version A): Make sure you create backups of this file on at least 2 different computer devices as soon as you can. This TrueCrypt pdf file (version A) contains the ‘password protected pdf file’ that contains the information to access all my Bitcoins. In the password protected pdf file is all my electrum seeds, and bitcoin public and private addresses of all my bitcoins. Note that you should load the addresses from the Electrum seeds rather than from the private addresses if you plan to use them, since there may be more addresses which haven’t been recorded on the pdf document which were generated and used afterwards by the software.


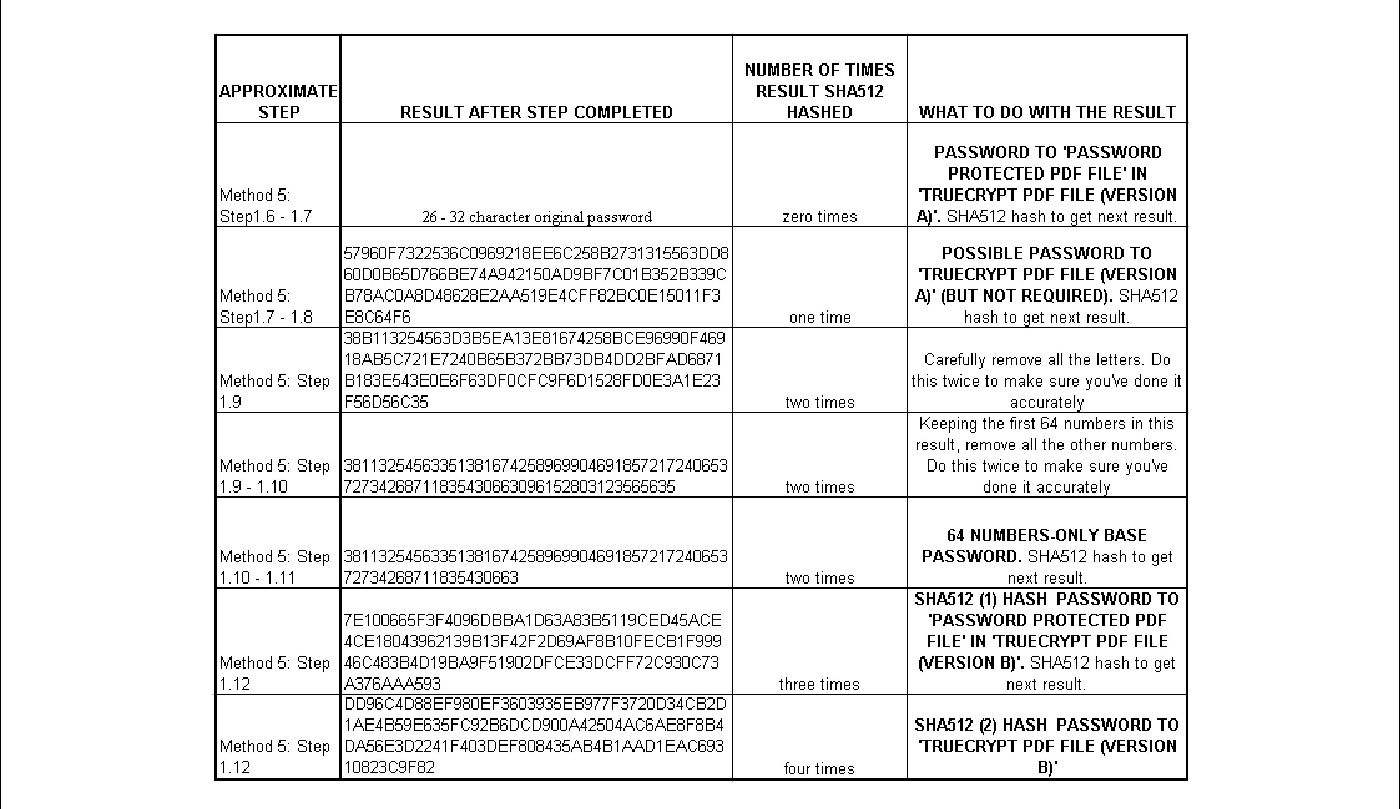
To open the ‘password protected pdf file’ use your 26 - 32 character password. 


To open the ‘TrueCrypt pdf file (version A)’ file though you may need to use ‘QuickHash-Windows-v2.6.9.2’ to create a SHA512 hash of the 26 – 32 character password and use that SHA512 hash to open the TrueCrypt pdf file (version A) first. Try this if you can’t gain access with only the 26 – 32 character password.


TrueCrypt pdf file (version B): Make sure you create backups of this file on at least 2 different computer devices as soon as you can. This TrueCrypt pdf file (version B) contains the ‘password protected pdf file’ that contains the information to access all my Bitcoins. In the password protected pdf file is all my electrum seeds, and bitcoin public and private addresses of all my bitcoins. Note that you should load the addresses from the Electrum seeds rather than the private addresses if you plan to use them, since there may be more addresses which haven’t been recorded on the pdf document which were generated and used afterwards by the software.


To open both these files use your 64 digit numbers-only password. If entering it directly for all the files doesn’t work then use ‘QuickHash-Windows-v2.6.9.2’ to create a SHA512 hash of these 64 numbers. Then create a SHA512 hash of this result. The second SHA512 hash result will be the TrueCrypt pdf file (version B) volume password. The first SHA512 hash result will be the password to the ‘password protected pdf file’ within the TrueCrypt pdf file (version B) volume.


QuickHash-Windows-v2.6.9.2: This program will create the SHA512 hash to produce your required password to the TrueCrypt pdf file. In Linux Mint: Open ‘QuickHash-Windows-v2.6.9.2’ folder on desktop > double click ‘QuickHash-Windows-x86-v2.6.9.2’ > select ‘SHA512’ > then start using.


truecrypt-7.1a-linux-x86.tar.gz: This program is needed to open the TrueCrypt pdf file, by mounting it first on a virtual drive. In Linux Mint: Click ‘Menu’ on the bottom left hand side of the desktop > search ‘truecrypt’ in the search bar > click on the ‘TrueCrypt’ option that appears > click ‘Select File...’ > search for ‘TrueCrypt pdf file’ on usb drive > select ‘TrueCrypt pdf file’ by pressing on it> click ‘Open’ > click on any ‘Slot’ (1-64) on the main menu > click ‘Mount’ > Enter the password (see QuickHash-Windows-v2.6.9.2 notes and TrueCrypt pdf file notes above to see what the correct password is) >click ‘OK’ .


Once mounted: In Linux Mint: Open the folder that opened automatically but if one doesn’t open automatically, search for the new folder that just appeared on the Linux Mint desktop (named as ‘thefilesize+Volume’) and double click on that > then double click the password protected pdf document within > enter password > then click ‘Unlock Document’ to view the document. 


Once you have finished using all the programs: In Linux Mint: click ‘Dismount All’ on the TrueCrypt main menu > Press ‘Exit’.


‘Public Addresses Only’ pdf file: This pdf document contains the public addresses (and not private addresses or electrum seeds) of most (if not all) of my bitcoins. Use this document if you want to view the public addresses I own and see the funds in it by creating a ‘watching only’ wallet using Electrum software: Open ‘Electrum’ program > press ‘File’ > press ‘New/Restore’ > click ‘OK’ > select ‘Watch Bitcoin addresses’ > copy and paste all public addresses into Electrum program > click ‘Next’ > click ‘OK’.


‘Electrum portable’ software: This program is the Bitcoin software you should use to create your bitcoin wallets from the seed words and seed extension words on the TrueCrypt pdf file/s. To run the program: while within the Linux Mint usb operating system, insert an empty usb into your computer usb port, then copy and paste the whole ‘electrum portable’ program onto the usb, then double click the electrum portable program and run it off the usb. Always include a strong password when creating an electrum wallet from a seed or from bitcoin private addresses. After creating the wallet file, in order to start using it, restart your computer in a newly created Linux usb operating system, and then load the electrum portable program again from the usb. Following this, connect to the internet from a mobile device using USB tethering after setting a newly chosen random password for that connection, and then complete your bitcoin transactions. Ideally the mobile device or phone you use to connect to the internet with, will have just had a factory reset done, although this is not strictly required for most everyday users (consider using an old phone you have lying around solely for this purpose though). After doing all this, completely format/delete all the files on all the usbs while still within the Linux usb operating system (by doing a full format of the usb's).


***Go to www.bitgoldwallet.com for information on what bitcoin is and how to safely buy, use and store it, and how to choose a secure and memorable password (like the one that may have been used to secure these files). Its Method 5 section also has a copy of these instructions above***

>>> End of Doc <<<

        Step 4.2: Save the file and name it ‘IMPORTANT INSTRUCTIONS FROM (your_name) – READ HERE’. Put your name in the file name in capital letters where it says ‘(your_name)’ so whoever sees it knows it is from you. Then copy and paste it onto Usb No. 6. 

 
        Step 4.3: Copy and paste the ‘IMPORTANT INSTRUCTIONS FROM (your_name) – READ HERE’ document onto the ‘Master usb’ after inserting the ‘Master usb’ and opening it to view its contents. 
 
        Step 4.4: Now copy and paste from Usb No. 6 the ‘TrueCrypt pdf file (version A)’ and ‘TrueCrypt pdf file (version B)’ -if available- onto the ‘Master usb’. Also copy and paste the ‘Public addresses only’ non-password protected pdf file -if available- onto your ‘Master usb’. Also copy and paste the TrueCrypt 7.1a installer program ‘truecrypt-7.1a-linux-x86.tar.gz (for 32 bit machines)’ onto the ‘Master usb’. Also copy and paste ‘QuickHash-Windows-v2.6.9.2’ onto the ‘Master usb’. And finally also copy and paste the ‘Electrum portable’ program onto the ‘Master usb’. 
 
 
Step 5: Boot up your computer in the Linux Mint 18.1 usb operating system using your ‘Master Usb’
 
        Step 5:1: Boot up your computer in the Linux Mint usb operating system the same way you would boot it up in the Zorin OS Core usb operating system. If you do not remember how to do this or are unsure, see Method 3: steps 3.1 – 3.3. 
 
When the load screen appears notifying you that the system will load in 10 seconds, you can hit ‘Enter’ twice if you like, to speed up the boot.
 
Also note that from this step onwards, you are never to enter any of your pdf or TrueCrypt passwords into the Linux Mint operating system for the entire time you are using it. This will eliminate the possibility that your passwords may be stored on the master usb and may be later stolen.
 
 
Step 6: Install ‘Wine’ in the Linux Mint usb operating system to enable you to use ‘Electrum portable’ on it in the future
 
         Step 6.1: With your Linux Mint desktop screen showing, on the bottom right hand side of the screen select the ‘icon’ that allows you to connect to the internet. (See the "Additional Information" notes at the end of Method 3 for a guide on how to securely connect to the internet). Select your connection and connect to the internet.
 
        Step 6.2: On the bottom left hand side of the screen press the ‘Menu tab’, move your mouse up to the ‘Software manager’ which is the second option from the top left, then press it. The ‘Software manager’ screen will appear.
 
         Step 6.3: Type in ‘Wine’ in the search panel then press ‘Enter’.
 
         Step 6.4: A whole list of programs should appear. Select the top program on the list called ‘Wine’ by double clicking it, then press ‘Install’. 
 
As it is installing, boxes may appear requesting permission to download and install additional programs to enable ‘Wine’ to work. Click ‘Yes’ everytime. Once completely installed, close the ‘Software Manager’.
 
         Step 6.5: Insert Usb No. 6 into your computer and experiment with the ‘Electrum portable’ program by running it off Usb No. 6 to test that it works properly. Do not load up any wallets from seeds or private keys you have created previously, but rather just experiment with creating a new electrum wallet. You are only checking that the program can work correctly once installed.
 
When you run ‘Electrum portable’ in Linux Mint from Usb No. 6 for the first time, it may ask for permission to install additional components from the internet. Click ‘Cancel’ every time as these are not needed for offline use.
 
         Step 6.6: Now copy and paste the ‘Electrum portable’ program onto the Linux Mint desktop. 
 
        Step 6.7: Once the whole process is complete go back to your internet icon on the bottom right hand side of your screen and disconnect from the internet by clicking the internet ‘icon’ on the bottom right hand side of the desktop screen, then clicking on the ‘slider’ next to your ‘Wireless’ or ‘Wired’ connection to turn it off. Now click on the internet icon again on the bottom right hand side of your desktop screen, then click ‘Network Connection’, then select your previous connection, click ‘Delete’, then click ‘Delete’ again to confirm, and then click ‘Close’.
 
        Step 6.8: Now click on the Bluetooth icon on the far bottom right hand side of the desktop screen and disable it by clicking on the Bluetooth ‘icon’ and then pressing the ‘On/ Off’ button to disable it. Lastly, click on the Volume icon on the bottom right hand side of the desktop screen, then click ‘Sound Settings’; then leaving the ‘Output’ Tab, click the Volume icon on the left to disable the sound, then select the ‘Input’ Tab by pressing on it, and then click the Volume icon on the left to disable the microphone; then finally select the ‘Sound Effects’ Tab by pressing on it, and then click the Volume icon on the top left to disable all sound effects and then close the window.
 
From this step onwards, an internet connection is not needed and you should remain disconnected from the internet for the entire time you are using the Linux Mint operating system.
 
 
Step 7: Add to the Linux Mint 18.1 usb operating system ‘Master Usb’ the required programs and files

         Step 7.1: With the Linux Mint desktop screen showing, copy and paste the ‘Electrum portable’ program from Usb No. 6 or Usb X (whichever drive contains the program) onto your desktop. Do not copy and paste any other wallet files, only the ‘Electrum portable’ program.
 
         Step 7.2: Copy and paste ‘QuickHash-Windows-v2.6.9.2’ from Usb No. 6 or Usb X (whichever drive contains the program) onto the Linux Mint desktop. Right click the ‘QuickHash-Windows-v2.6.9.2’ program on the desktop, press ‘Extract here’ then delete the original unextracted QuickHash file. Then open the ‘QuickHash-Windows-v2.6.9.2’ folder on the desktop and delete ‘QuickHash-Windows-x64-v2.6.9.2’ as this is not needed and can be confusing if kept.
 
        Step 7.3: Copy and paste from Usb No. 6 or Usb X (whichever drive contains the program), the TrueCrypt 7.1a installer program ‘truecrypt-7.1a-linux-x86.tar.gz (for 32 bit machines)’ -which you downloaded in Step 2.7- onto your Linux Mint desktop. After this, right click the ‘TrueCrypt program’ on your desktop, then click ‘Extract here’.
 
        Step 7.4: Install the ‘TrueCrypt 7.1a’ Linux installation package onto the Linux Mint usb operating system. If you don’t remember how to do this or are unsure, see Method 4: steps 3.4 – 3.8. Once finished; cut and paste both the ‘truecrypt-7.1a-linux-x86.tar.gz’ installation package and ‘truecrypt-7.1a-setup-x86’ extracted files folder still on the desktop into the ‘QuickHash-Windows-v2.6.9.2’ file folder on the desktop to avoid future confusion.
 
        Step 7.5: Copy and paste both copies of ‘TrueCrypt pdf file (version A)’ and ‘TrueCrypt pdf file (version B)’ - if available- from Usb No. 6 onto the Linux Mint desktop.
 
         Step 7.6: Copy and paste the ‘IMPORTANT INSTRUCTIONS FROM (your_name) – READ HERE’ document onto the ‘Master usb’ desktop. Open this file from the desktop after you do this using ‘LibreOffice Writer’ and convert the document into pdf format to store it on your desktop. Keep the non pdf version of the ‘IMPORTANT INSTRUCTIONS…’ document on the desktop. Linux Mint: Within LibreOffice Writer select ‘File’> select ‘Export as PDF...’> press ‘Export’ > press ‘Save’ > Then close ‘LibreOffice Writer’.
 
Congratulations, your ‘Master Usb’ with the ‘TrueCrypt pdf file (version A)’ and ‘TrueCrypt pdf file (version B) - if available- ; ‘IMPORTANT INSTRUCTIONS…’ document; and other additional files, is complete and ready to be buried. If you like, you can load the ‘Master usb’ Linux operating system again to test that the operating system loads correctly and that all the files have been installed successfully. Remember though, that at no time are you to enter your passwords to open the TrueCrypt pdf files or documents.
 
 
Step 8: Bury your Master Usb in an underground location
**********************************************************************************************************************************************************************************
           It is advisable to now prepare a copy of the Master Usb with all the files contained on it onto a DVD disk. You can do this by simply transferring (or burning) everything on the Master Usb onto a DVD disk using the ‘Brasero’ program after inserting the Master Usb into the usb drive. You will then bury this DVD afterwards at the same time, and in the same package/place as the Master Usb.

**********************************************************************************************************************************************************************************

Use your common sense and make sure you do the actual burying at a time and place where it is unlikely anyone will see you. Also choose a good location such as your backyard or if you have alot of bitcoins, away from your main place of residence and in a secondary place of residence which you own. Also take into account possible environmental disasters such as floods, hurricanes or forest fires which may cause you to lose your buried usb’s. Strongly consider burying it in more than one place to mitigate all these risks (in which case you will need to prepare more master usb’s each from the beginning of step 2; you cannot simply copy and paste all the files onto another usb drive). 

 
Also, you should be aware that it is unknown how long your usb flash drive will accurately retain its data when not accessed in this way. No one can really know for sure as the technology was only invented sometime between the year 1995-2000. SanDisk quote 10 years data retention on their datasheets. We believe that this period is longer (in the vicinity of 100+ years) but recommend that you rewrite or replace the buried usb drive at least once every 10 – 15 years. SanDisk do however offer a product called ‘SanDisk Memory Vault’ that quotes a data retention period of 100 years, so you can use this as an additional backup to bury also, if you prefer.
 
Step 8.1: Take your completed ‘Master usb’ and completely wrap it in several layers of plastic (food) wrap. Then completely wrap it in several layers of aluminum foil. This material will completely shield the usb from Electromagnetic pulses (EMP) which may damage or render the usb useless.
 
        Step 8.2: Now repeat step 8.1 to make it extra safe against EMP pulses.
 
        Step 8.3: Place your foil/plastic wrapped master usb into the hard usb case. 
 
        Step 8.4: Place your hard usb case inside the hard plastic container. These hard containers will protect the usb from hard shovel knocks during retrieval.
 
        Step 8.5: Completely wrap your hard plastic container in several layers of sticky tape to protect it from water damage. Do not leave any gaps at all.
 
        Step 8.6: Completely wrap your sticky taped hard plastic container in several layers of plastic bags to further protect it from water damage and to also protect it from dirt and bugs. The easiest way to wrap it using just one or two plastic bags is to put it in the bag, then tie the bag up in a knot, and then wrap it around again in on itself, tie another knot, and then repeat if possible.
 
        Step 8.7: Bury your plastic bag wrapped, sticky taped hard plastic container covered, hard usb case covered, foil/plastic wrapped master usb… in your chosen location.
 
Congratulations, you have optimally buried your Master Usb.
 
 
Step 9: Delete all remaining ‘TrueCrypt pdf file (version A & B)’ copies from all storage mediums after ensuring you have a sufficient number of smaller TrueCrypt pdf files (see the italicized 7th and 8th points of Method 5 Guidelines for details), and then format all unnecessary usb drives.
 
                                                                                                                        Important:
 
If you are planning to immediately (right now) store your password protected pdf file using Method 6 then skip the rest of Method 5 (steps 9.1 – 9.14) and go straight to the method you are using. 

Method 6 if done needs to be completed all in the same sitting or occasion as Method 5. You cannot use previously made and stored Method 3 or Method 4 or Method 5 files created during a previous sitting or occasion. Only current password protected pdf files and TrueCrypt pdf files created from the beginning of Method 3: Step 1 can be used when proceeding to Step 5 or 6. You need to always do Method 4 immediately after Method 3. You need to always do Method 5 immediately after Method 4. You need to always do Method 6 immediately after Method 5. Doing it all on the one single occasion ensures fewer mistakes and less chances of security breaches or problems.

If you don’t plan to immediately (right now) store your password protected pdf file using Method 6 then continue onto Step 9.1 where we will format all the usb drives, after making the necessary backups.
 
 
         Step 9.1: Re-boot your computer into the Linux usb operating system on Usb No. 5 (see method 3: step 3 if you don’t remember how to do this). Then create a sufficient number of smaller TrueCrypt pdf files (version A) so you can access and use the bitcoins stored in them without having to dig up your buried Master usb. See the italicized 7th and 8th points of Method 5 Guidelines for details. If you like, you can choose to not create these smaller TrueCrypt pdf files (version A) and just keep the single TrueCrypt pdf file (version A) and store this instead.

        Now transfer the TrueCrypt pdf file onto yet another usb drive that has been pre-formatted (the extra-Usb). You can use the Linux usb operating system to completely re-format the usb drive again if you like (see method 5: Step 9.3 for an example of how to do this). This usb drive will serve as the final resting place of the TrueCrypt pdf file/s. Alternatively, you can also transfer the file/s to an external hard drive as a second backup. Be very careful to ONLY transfer the TrueCrypt pdf file/s and be careful not to transfer them onto any of your main computer hard drive/s where your regular computer operating system is (Windows 7 in our case). Storing it on your main computer hard drive/s will make it more accessible to online hackers. If you accidently make a mistake and transfer any unsecured LibreOffice or other files then you need to restart this method from the beginning of Method 3: step 1.
**********************************************************************************************************************************************************************************
                                        OR STORE ON A DVD DISK (ALTERNATE STORAGE MEDIUM)

        Step 9.1.5: While still within the Linux operating system, transfer the password protected pdf file (and optionally the electrum wallet file/s if desired) onto a blank DVD disk by burning them onto the disk (see Method 3: Steps 3A.1 – 3A.6 for instructions). This DVD disk will serve as the final resting place of the TrueCrypt pdf file. Be very careful to ONLY transfer the TrueCrypt pdf file and be careful not to transfer them onto any of your main computer hard drive/s where your regular computer operating system is (Windows 7 in our case). Storing it on your main computer hard drive/s will make it more accessible to online hackers. If you accidently make a mistake and transfer any unsecured LibreOffice or other files then you need to restart this method from the beginning of step 1.

**********************************************************************************************************************************************************************************


        Step 9.2: OPTIONAL STEP: Carefully transfer the electrum wallet file/s you created in Method 3: Step 5 onto your main operating system’s (Windows 7 in our case) electrum wallet folders (if you don’t still have a copy of these then you can create new one/s using the seeds from the TrueCrypt pdf file). It is possible to transfer the wallet files from within the Linux usb operating system by first mounting the drive containing the electrum wallet folders (usually drive C). 

Zorin OS: Click ‘Z’ menu bar icon on bottom left hand side of desktop > select ‘Documents’ > scroll down to ‘+ Other Locations’ and click it > click on the drive containing the electrum wallet folders to mount the drive (usually drive C although the name of the drive will not be visible, only its size) > open the correct folder (usually C: \Users\ Name_of_your_computer\ AppData\ Roaming\ Electrum\ wallets) > copy and paste the wallet files into this folder.  

        Your main operating system’s (Windows 7 in our case) electrum wallet folders were created when and if you completed Method 2 (when we installed the electrum desktop program ‘electrum-2.7.18-setup.exe’ into the main operating system (Windows 7 in our case)). If you prefer instead to transfer the wallet files created in Method 3: Step 5 while using your regular computer operating system (in our case Windows 7), then see the instructions immediately before Method 2: Step 4 for details of how to do this. Bear in mind however that transferring the file using the main operating system (in our case Windows 7) has slightly more risk since the wallet files may be more exposed to malware on your regular operating system when the usb containing the files are initially inserted.

        Step 9.3: Completely format Usb No. 6 within Zorin OS by doing the following: 

        Insert Usb No. 6 into a free usb port. In the Zorin OS operating system desktop, take notice of the name of the new drive that appears. In our example case it is ‘2.1 GB Volume’. Click the ‘Z’ menu bar icon on bottom left hand side of desktop. Then click ‘Documents’. Now scroll down to the part that shows the usb drive you just inserted. The name should match the name of the drive on your desktop. In our example case it is ‘2.1 GB Volume’. The drive should have the mark that looks like an upwards facing arrow immediately on the right hand side of it which shows that the drive has been mounted. 

        You will first be doing a quick format and then later a full format of all the data on this usb drive. For the quick format, right click this drive ‘2.1 GB Volume’, then click ‘Format’. In the screen that appears leave everything at the default setting:

        Erase: Don’t overwrite existing data (Quick)
        Type: Compatible with all systems and devices (FAT)

        Then click ‘Format...’. On the next ‘Are you sure you want to format the volume?’ screen that appears, click ‘Format’. 

        Now for the full format, right click this drive ‘2.1 GB Volume’ again, and then click ‘Format’. In the screen that appears change the first part beside ‘Erase’ so you have the following settings:

        Erase: Overwrite existing data with zeroes (Slow)
        Type: Compatible with all systems and devices (FAT)

        Then click ‘Format...’. On the next ‘Are you sure you want to format the volume?’ screen that appears, click ‘Format’. 

        Now wait up to 10 minutes for your computer to completely format the usb drive. While it is doing this, no indication that this is happening will show on your screen but rest assured your computer is formatting the drive. Once the drive has been completely formatted, the usb will reappear on your screen (not the desktop). On our screen it shows ‘2.1 GB Volume’ again. This is how you will know the format has been completed.

        Step 9.4: This is a redundant step from an older version of this guide. Please disregard.
**********************************************************************************************************************************************************************************
           If you are currently running the Zorin OS operating system from the Live DVD then you can skip the next step, Method 5: Step 9.5

**********************************************************************************************************************************************************************************


        Step 9.5: Switch off your computer. Insert Usb X which is the second newly created Linux usb operating system that was prepared in Method 3: Step 2.8, and boot up your computer in the Zorin OS Core or Linux Mint (Linux based) usb operating system using Usb X.

        Step 9.6: Completely format Usb No. 5 within Zorin OS by doing the following: 

        Insert Usb No. 5 into a free usb port. In the Zorin OS operating system desktop, take notice of the name of the new drive that appears. In our example case it is ‘2.1 GB Volume’. Click the ‘Z’ menu bar icon on bottom left hand side of desktop. Then click ‘Documents’. Now scroll down to the part that shows the usb drive you just inserted. The name should match the name of the drive on your desktop. In our example case it is ‘2.1 GB Volume’. The drive should have the mark that looks like an upwards facing arrow immediately on the right hand side of it which shows that the drive has been mounted. 

        You will first be doing a quick format and then later a full format of all the data on this usb drive. For the quick format, right click this drive ‘2.1 GB Volume’, then click ‘Format’. In the screen that appears leave everything at the default setting:

        Erase: Don’t overwrite existing data (Quick)
        Type: Compatible with all systems and devices (FAT)

        Then click ‘Format...’. On the next ‘Are you sure you want to format the volume?’ screen that appears, click ‘Format’. 

        Now for the full format, right click this drive ‘2.1 GB Volume’ again, and then click ‘Format’. In the screen that appears change the first part beside ‘Erase’ so you have the following settings:

        Erase: Overwrite existing data with zeroes (Slow)
        Type: Compatible with all systems and devices (FAT)

        Then click ‘Format...’. On the next ‘Are you sure you want to format the volume?’ screen that appears, click ‘Format’. 

        Now wait up to 10 minutes for your computer to completely format the usb drive. While it is doing this, no indication that this is happening will show on your screen but rest assured your computer is formatting the drive. Once the drive has been completely formatted, the usb will reappear on your screen (not the desktop). On our screen it shows ‘2.1 GB Volume’ again. This is how you will know the format has been completed.

        Step 9.7: Boot up your computer in your regular operating system (in our case Windows 7). 

        Step 9.8: This is a redundant step from an older version of this guide. Please disregard.
        Step 9.9: This is a redundant step from an older version of this guide. Please disregard.

        Step 9.10: Do a quick format of Usb No. 5 (a quick format should be done and NOT a complete format). Windows 7: Insert Usb No. 5 into free usb port > right click usb drive > click ‘Format…’ > click ‘Start’ > click ‘OK’.

        Step 9.11: Do a complete ‘Eraser’ format of Usb No. 5. This process can take a while so be patient. Windows 7: Right click usb drive > select ‘Eraser’ > click ‘Erase Unused Space’.

        Step 9.12: Do a quick format of Usb X (a quick format should be done and NOT a complete format). Windows 7: Insert Usb X into free usb port > right click usb drive > click ‘Format…’ > click ‘Start’ > click ‘OK’.

        Step 9.13: Now do a complete format of Usb X (a complete format should be done now and not a quick format). Windows 7: Right click usb drive > click ‘Format…’ > Uncheck ‘Quick Format’ > click ‘Start’ > click ‘OK’.

        Step 9.14: Finally do a complete ‘Eraser’ format of Usb X. This process can take a while so be patient. Windows 7: Right click usb drive > select ‘Eraser’ > click ‘Erase Unused Space’.

ADDITIONAL INFORMATION


How to Access Your Bitcoins:


  • The only acceptable way to ACCESS your data stored in your TrueCrypt pdf file is using your personal computer/laptop and opening it in a newly created Linux usb operating system (either Zorin OS or Linux Mint). This is the same system used to create the pdf in Method 3 and Method 4. The reason this is the only acceptable way is because you can be 100% sure that there are no keyloggers or other malware on it. If you have used a 26-32 character password for this pdf file then this is the only acceptable way to access the file. Stay offline for the entire time you are accessing the file and never connect to the internet BEFORE, DURING or AFTER entering your pdf password into the Linux usb operating system (just incase the system has acquired a malware program or had one pre-installed). If you never connect to the internet, then there is no chance for any password or other data to be leaked even if it has been captured. Remember that Method 4 and Method 5 passwords must never be discovered by another person, and entering it in this way will prevent this discovery.  


How to Transact With Your Bitcoins:


  • The safest way to TRANSACT with your bitcoins is by alternating between using an online operating system (in this instance it can be either Zorin OS or your regular operating system) and a completely offline operating system (Zorin OS only) and basically creating the transaction in the online machine, before signing it in the offline machine, and then broadcasting it on the online machine. To do this using electrum: you would create a watching only electrum wallet on the online computer (using the public addresses or master public keys), and then go to the offline Linux operating system to sign the transaction from the ‘Raw transaction’ data, before loading the ‘Signed transaction’ again in the online operating system and then ‘Broadcasting’ it. If you do this, at no time will your private keys or passwords be used in the online session. Specific details on how to transact in this way can be found via online web searches. Do note that the Zorin OS 12 Core operating system cannot run the newest version of electrum, so your regular operating system needs to run the newest version of electrum for the online machine.


  • If you do not want to transact in this way, or are having difficulty with using your regular internet connected operating system together with electrum to transact with your bitcoins, then you can also transact with your bitcoins by using a website called www.coinb.in . This website allows you to transact with your bitcoins in an online-offline manner; using any internet browser on any operating system, phone or tablet. Transactions here are signed directly with the bitcoin private key so there is no need to use the electrum program.


  • To do this: go to the website www.coinb.in/#about on your online machine and then click the ‘download’ link at the very bottom on the page, which leads to: https://github.com/OutCast3k/coinbin/archive/master.zip . Then save this file named coinbin-master.zip onto a usb or dvd (see the Checksums page for the checksums of this file). This file will then be run on the offline machine by double left clicking the file named ‘index.html’. If possible, open it using a different browser to the default browser. Do an online websearch for speciifc instructions on how to perform the transactions in an online-offline manner.


  • Be very careful when transacting with the coinb.in method and make sure you test small amounts first to become familiar with the procedure. In particular, make sure you send the change back to one of your own bitcoin addresses and not leave it as part of the Transaction fee, which would instead be sent to the miners. There are famous examples of people having mistakenly sent huge amounts of bitcoins to miners this way.


Other Information:


  • If you choose to view websites while using the Zorin OS usb operating system, do not use or even open the default browser. Remove the default browser from the desktop by right clicking on it and then clicking "Remove from Favorites". After this, download a pre July 2022 version of the Firefox browser and install it into the Zorin operating system during a new session (after transferring the firefox file from the dvd or usb). Use the version built for 32 bit linux operating systems. The downloaded Firefox package file should end in ".tar.bz2". Firefox browser versions after approximately July 2022 don't work within the Zorin operating system and therefore only a pre July 2022 version of the software can be used. "firefox-94.0.2.tar.bz2" is the recommended version number to use. After installing it, and running it for the first time; while still offline, go to "Settings", then scroll down to the checkbox "Check for updates but let you choose to install them." and click it. Lastly, before you start using the Firefox browser online, always install the "Duckduckgo.com browser addon' by going directly to the duckduckgo.com website and following the prompts to install it. 


  • Additionally, to connect to the internet while using Zorin OS, use an internet 4G/LTE router device (not a mobile phone) that lets you connect to the internet using a mobile sim card. Only use the ethernet port and the ethernet cable and switch off the wifi option on the router. Set a strong password on the router to make it difficult for hackers to access remotely. If you access the internet using Zorin OS then it is absolutely essential for you to disconnect and then reconnect the battery and then RAM cards for 10 seconds every single time before switching on the computer. This will help reset the CMOS and help to wipe any bios level malware that may have infected your computer during the online session. And when you switch off the computer, do so by simply pressing and holding onto the power button until it switches off.


**********************************************************************************************************************************************************************************
    QR CODE Scanner / Generator programs:

The following 2 lightweight programs can be used on both your online and offline computer to read and/or generate QR codes used in transferring information from the online computer to offline computer and vice versa. They have been found to use minimal computer processing resources which make them suitable for use in the Zorin OS operating system. The QR Code reader program shown here can read image files of QR codes but cannot take the images, which means you will need to take a photo of the QR code first using the Zorin OS webcam program called ‘Cheese’ before loading the photo in the QR code reader program (search ‘cam’ or ‘cheese’ in the Zorin menu bar to find the ‘Cheese’ program). If your QR codes are too large to process, then you can break the characters used to create them into 2 or more sentences to make the QR codes smaller.

    QR CODE READER:

            OnBarcode QR Code Scanner : Name of file upon first download is ‘qrcode.zip’ . Version number 3.0.0. Downloadable from http://www.onbarcode.com/scanner/qrcode_download.php . Checksums of file upon first download: MD5 = 6B4711FF7E308ACA0F21048C8302930B SHA-1 = F5CD6E3BFBB9E23516023B943970930044C7C3F3 (see Checksums page for SHA256 and SHA512 checksums).

    QR CODE GENERATOR:

            Update pending...

**********************************************************************************************************************************************************************************

***** 2024 UPDATE: CRITICAL UPDATE COMING SOON *****


To obtain the maximum level of security possible, a new section is currently being prepared that will show users how to use the above method on a newly purchased completely offline computer that will only be ever used to create your bitcoin keys and wallets and to sign your bitcoin transactions. This will be a dedicated offline computer used only for bitcoin purposes. Every single time, before the computer is switched on, users will need to open the computer up and disconnect and then put back in all the RAM cards to reset the system. The sound and network cards, as well as the microphone of this offline computer will be physically removed permanently (not just disabled), and the computer will never ever be connected to the internet. If possible, also remove the connected hard drive and also regularly replace the mouse and keyboard that is used with this computer to prevent compromised malware from hijacking your operating system. Additionally, this offline computer will never have any usb’s connected to it except during the initial installation or when retrieving stored bitcoin data from the dedicated storage usbs. All transfers of information (in the form of master public keys, raw transaction text and signed transaction text) from this offline computer to your online computer and vice versa will be via QR code images captured on the completely offline computer using an external webcam that is connected only when used. This new section will replace Windows 7 with Windows XP as the initial operating system. Zorin OS will remain the usb operating system however instructions on how to create a Zorin OS Live CD will be included for extra security and convenience. And so too will instructions on how to transfer the encrypted bitcoin files onto a CD/DVD for permanent, less alterable storage. These measures are designed to eliminate the ever present danger of malware infecting your computer and/or usb’s and compromising your bitcoin security. Click here for details...


**************************************************************************************************************************************************************

All Work-in-progress / Planned additions or Alternate steps to Method 5, which will be in this New section are currently shown in BLUE font on this ‘Method 5 (Deep cold storage) webpage.

**************************************************************************************************************************************************************